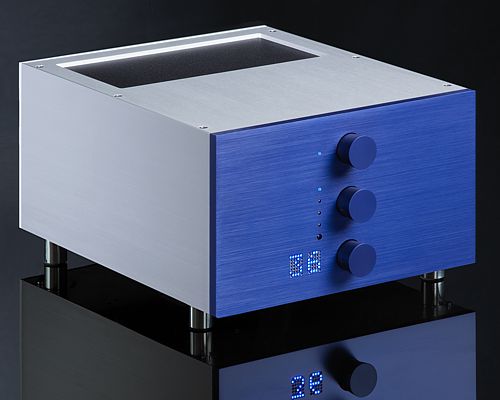
Error-correction power amp
I have always thought that there was an interesting difference between negative feedback (nfb) and error correction (ec) in an amplifier loop1). But it's more subtle than that.
In Part I of the article I give some equivalent conceptual circuits that show the embedded positive feedback loop within a H.ec loop. (when I refer to ec I mean the topology as presented by Malcolm Hawksford in his original publication on error correction).
Negative feedback relies on excess gain in the main amplifier (forward) loop. By returning a part of the output signal to the input, the amplifier gain becomes much smaller, but also distortion becomes much smaller. Output impedance becomes much smaller, and input impedance becomes much higher. In other words, the amp becomes much more ideal. So this is a kind of trade-off: we give up most of the large (open loop) amp gain to get a much more linear and ideal result. Sounds pretty neat, but what about that (very) large open loop gain we need to make nfb work? That in itself can be a source of problems.
Nfb is quite old, it was invented by in 1934 by Harold Black (7 years after he invented feedforward!). If you are interested in how this works in more detail, here's his original paper. My implementation is different, both for the output stage as well as for the voltage amplifier stage. The output stage circuit is provided courtesy of Elektor Electronics.
Error correction is, in my view, an elegant, simultaneous application of positive and negative feedback.
 Error correction looks at the difference between the amp output and the amp input (taking into account of course the amp gain). Any difference is returned to the input and added to that input, in precisely the right amount to make the output identical to the input. Because the output is now identical to the input, distortion becomes ideally not just smaller, but zero. In practice, this will not happen, as the precision with which you can return the error and add it at the input is always less than perfect, but it is in theory possible. Also, whatever the load, the output stays correct, so it looks as if the output impedance is really zero (or close to it). This technique does not require that the amp (open loop) gain is very, very high. It is enough if the amp has a gain close to the final required gain, and then the ec fills in the missing fraction in the signal. See here for the conceptual approach.
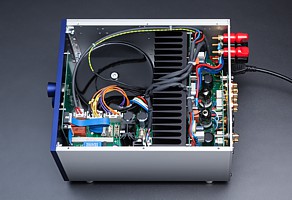
So, when the dust settled, I realised that the embedded positive feedback in H.ec makes the forward loop (ideally) infinite, and that the nfb then takes over as in any high open loop gain amplifier. I build a few models of this amplifier and the real world (of course) follwed the theory pretty well. The amps even sounded very good! I wrote two construction articles about this amplifier and those were published by Elektor Electronics and AudioXpress. The first two articles are about the amplifier itself, while the 3rd one describes the dual-slope safe operating area protection system. Boards and kits are available from Ward Maas.
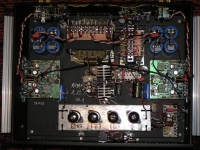 Hybrid paX
Stanislav Kucera build an interesting combination of the paX output stage preceded by a tube Aikido voltage amplification stage. We had some discussions about the output impedance of the Aikido, because the paX output stage requires a constant, well defined source impedance. In the end Standa used a buffer to interface the Aikido to the paX, as well as a servo to null out the paX offset DC. Standa kindly allowed me to postthe schematics of the Aikido stage and power supply and the adapted paX output stage.
Running the paX at a lower supply voltage
A few people have asked for the necessary changes to run the amp at a lower supply voltage. The following changes need to be made for a supply voltage of +/-30VDC. That will give you an output power in 8 ohms of between 40 and 50 Watts.
Input buffer. Here, resistors R47, R48 need to be changed to keep sufficient current into the shunt zeners. Change the resistors to 1.2k ohms.
Vas stage. No changes necessary.
Output stage. A few changes are needed to keep enough current into the shunt zeners. Resistors R35, R36, R37, R38 need to be lowered. But, if they become too low, the time constant formed by these resistors and the bootstrap capacitors may become to small. So, to partially compensate for that, we lower D10, D11 to 12V zeners. Then, change R35, R36, R37, R38 to 499 ohms each. As a consequence, R44 need to be lowered to 6k.
Note that I have not tested this except for a quick DC verification. Still, I'd like to hear from you if you implement these changes.
If you run the amp at +/-30VDC in an active system, and with a speaker driver without a passive xover not lower than 4 ohms resistive, you can run it with a single output pair, if you want.
To leave out the outermost output devices (Q12 & Q13), the following components are not needed:
Q12, Q13, Q14, Q17, RV2; R22, R24, R26, R27, R30, R31, R52, R53; C2, C6, C13
If you use the XL spreadsheet to calculate the protection system values, note that with a single output pair you must use the single pair SOA
This comes as usual with the caveat that I have not tested this.